
Deploying a Model
Once a model has been trained and a satisfactory result has been obtained, the model can be deployed for use or purchase by another company.
This example assumes you have completed the Building a Model example first.
Sign into your account and click Model Manager in the Navigation sidebar. This page lists all your current models that you have purchased and all models that you have built and can now sell to other users.

There is currently one model available for deployment. Click the Start Hosting button to begin the process.
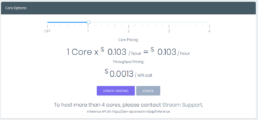
The Hosting Tier page allows a model to be hosted and used to perform predictions. To activate the model for your use, you must specify the number of cores (1-4) you want it to use during processing. Adding more cores allows more predictions to be made faster, so if you have a lot of data to process, increasing number of cores may be a good option. If you require more than 4 cores, please contact Stream Support. The number of cores you have selected and the number of times you use the model (call the API) will determine the total monthly cost of that model. At the bottom of the Core Options page you can find trackers to monitor your model usage history.
Create a Prediction Set
Once a model has been hosted, you can use it to make predictions on new data.
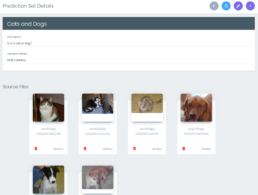
To begin, click Prediction Sets in the Navigation sidebar. On this page you will find all the Prediction Sets associated with your company. A Prediction Set is a collection of data, collected using the same hardware and hardware profile, that you wish to perform predictions on. After adding data to the Set, you can apply any of your hosted models with the matching hardware profile to that data to get predictions.
Click the “Plus” button to make a new Prediction Set.
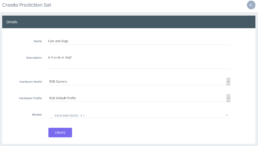
In the popup window, fill out all the requested fields. After you choose a Hardware Model and Hardware Profile, the “Models” field will populate with all the models you have access to with the matching profile. Multiple models can be selected for a Prediction Set, but in this case we have one – cats and dogs. Click Create to complete the process.

You will be taken to the Details page for your new Prediction Set. Click the “Plus” button in the taskbar to add data you want to make predictions on.
In the subsequent popup windows, choose a folder, then select and add the photos you want to classify. It is recommended that you choose images that were not a part of the training process, as they will likely produce artificially skewed results when the model is applied.

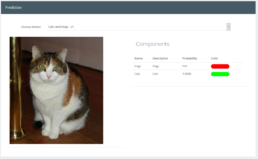
Click “Details” on any of the images added to the Prediction Set. In the Details screen you can select any model associated with your Prediction Set and see the result for the selected image.
Making Predictions Using an API Key
Model predictions can also be accessed through an API Key, bypassing the web interface of Stream.ML to make a quick prediction. In this process, no data is stored on the Stream.ML cloud and no history is kept on the site (normal API call charges still apply). API Keys can be used using your own software or an API testing tool such as Postman.
In the Model Manager screen, click on the Add Key button.

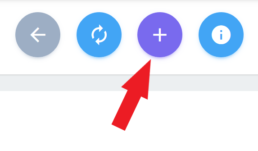
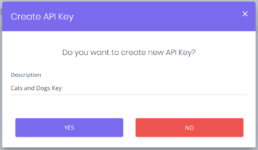
Press the “Plus” button to add a new key. In the popup dialog box, enter a description for your API Key and press Yes to continue. A key will be generated and now be available for use.
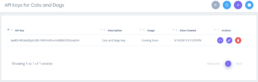
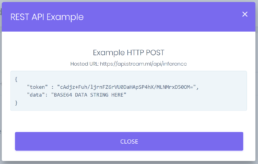
Clicking on the “<>” button next to the key in the Model Manager screen will bring up an example HTTP POST command with the URL you need to access the API.
Now that the API Key has been created, you can use it to perform predictions. Open an API testing tool such as Postman and start a new request.
Paste the address in the appropriate field and set the HTTP command to POST.
Add a header with value “application/json”.
Insert the example text from the website into the body. In the example text, replace BASE64 DATA STRING HERE” with the Base64 string of the image you wish to perform a prediction on (image to Base64 converters can be found online).


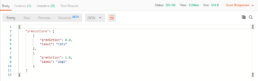
Hit Send to query the API. The result of the prediction will come back as JSON-formatted text data.